
In this series we will get to know to get started with SIM7020 in Nb-IoT. A Module developed by Simcom. In this first post we setup the evaluation board and check the time on the internet via an SNTP server. This tutorial will be carried on Ubuntu 20.04 using Minicom. For Windows user, you can use Putty instead of Minicom.
Introduction #
The Nb-Iot (Narrow-band IoT) is a cellular technology aimed at low power and low bandwidth application. It’s the perfect replacement for an old 2G application, where voice is not required. Its main targets are data-logging and smart metering, but you can employ it in many application where the data to be transmitted is relatively small. Nb-IoT modules require a dedicated SIM card, which also has a lower price with respect to a standard 4G SIM card. In this tutorial we will use a 1once SIM card and the SIM7020 evaluation board. In the first section we take a closer look to the evaluation kit and all its components. Then we will connect it via USB port and read its serial port via Minicom, the standard Linux terminal tool for accessing serial devices. In the third section we discuss what the SNTP is, while the last section deals with how to get the precise time from the internet via an SNTP server.

The SIM7020 Evaluation board #
The evaluation board is depicted below and the antenna is part of the kit. The SIM card should be bought separately, get in touch with us now if you need support for selecting the provider. Connect the antenna to the connector and insert an USB cable between the board and your laptop.
Please note that Nb-IoT usually requires a different contract from 4G/LTE

Connection and first AT command #
To find the board port you can call ls /dev/tty* before and after connecting the USB cable and then check which device appears after the connection. In Ubuntu it’s usually /dev/ttyUSBx and in the following /dev/ttyUSB0 will be used. Open the peripheral via minicom calling
minicom -D /dev/ttyUSB0At this point click on the reset button and you will see the boot log on the screen.
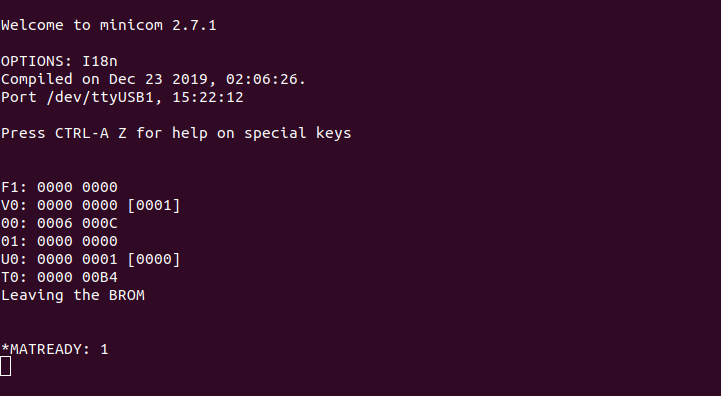
If you don’t see the screen, check the port name again, while if you see random ascii character, you have to set the baudrate to 115200. To do so, add to the minicom command the flag -p 115200. Now write the command “AT” and hit enter. If everything it’s fine the board should respond “OK”.
SNTP Server #
SNTP stands for Simple Network time protocol and it’s a subset of the NTP. It’s a protocol used by a client to ask a SNTP server for the precise time, which is usually synched with GPS or other high accuracy timing devices at the server location. SNTP is a straighforward and useful protocol based on UDP packets using by default the 123 port. More info can be found on wiki.
Connection to the network #
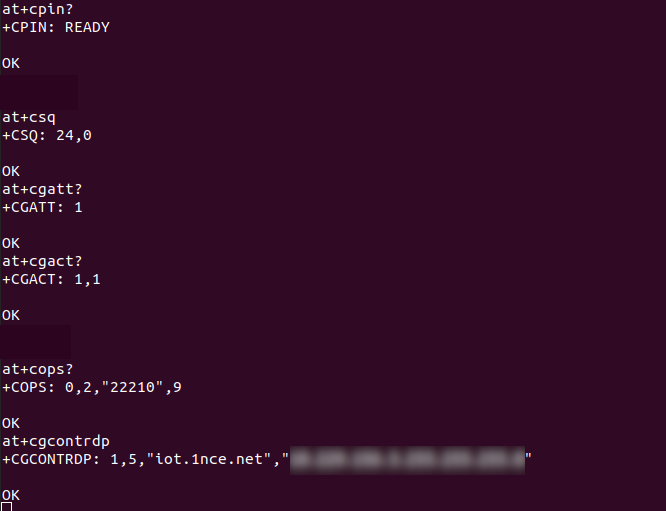
Before connecting to the SNTP server, we must enstablish the connection to the network. Before connecting, we check some network parameters:
AT+CPIN? // checks if a PIN is required, if not, "OK" will be shown
AT+CSQ // provides the signal quality report: <rssi>,<ber>
AT+CGATT? // shows if the GPRS/Packet domain is attached or not (1: attached)
AT+CGACT? // checks if the packet data protocol (PDP) is active or not
AT+COPS? // shows the operators in the network
AT+CGCONTRDP
After issuing the last command, you should get the name of your provider network and an IP, as shown in the screen below.
Reading the time #
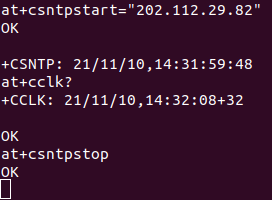
Now that the network connection is enstablished, we can connect to the SNTP server (with IP 202.112.29.82) issuing the command
AT+CSNTPSTART="202.112.29.82"After the connection, the server will immediately send us the time. If we need to ask for the time again, we can send
AT+CCLK?and receive the same response but with the updated time. To close the connection, send “AT+CSNTPSTOP”.
Conclusion #
In this tutorial we connected the board, briefly discuss the SNTP protocol, entstablished a network connection and get the time from a SNTP server. With this setup you can test the at commands provided by simcom at the bottom of this page (the pdf is available after registration). You have a project and need help for a fast start, get in touch with us now.
If you are still looking for the right host microcontroller please also get a look at other getting started docs here for Nuvoton and Espressif or a collection of important information of Holtek microcontroller.


