
Introduction #
Welcome! In this tutorial we will be configuring and programming the ESP32 with the ESP-AT firmware from Espressif. For this tutorial you’ll need:
- PC running Linux
- The examples shown here are running on Ubuntu 20.04
- Espressif ESP32-DEVKIT-C – Contact us for more info
ESP-AT #
ESP-AT is firmware that you can program onto an ESP32 to allow you to use the device as a standalone WiFi/BLE chip connected to another host MCU, rather than using the on-board MCU. The AT command set is also the easiest way to get started with the ESP32. ESP32 modules are pre-loaded with the default AT firmware, but it is sometimes necessary to change the interface (e.g. from UART to SPI) or to add functionalities which are disabled by default (such as BT classic). In all these cases you’ll need to download, configure and flash the AT firmware, and that’s what we’ll be looking at in this tutorial.
AT commands are the simplest way to interface an MCU or MPU with a wireless module – these are ASCII commands usually given through the serial port. The AT command set by Espressif enables WiFi, Classic BT and BLE connectivity and its scope keeps broadening, going from simple TCP/UDP packets to the MQTT(s) protocol.
Requirements #
To compile the AT firmware we need to start by getting the toolchain and libraries (called ESP-IDF). The newest release of esp-at automatically downloads the correct version of ESP-IDF, but to have it working, we need to install the requirements, as described in details here. Start by opening the terminal (CTRL+T) and write:
sudo apt-get install git wget flex bison gperf python3 python3-pip python3-setuptools cmake ninja-build ccache libffi-dev libssl-dev dfu-util libusb-1.0-0With anaconda #
If you are using anaconda, the python environment manager (https://www.anaconda.com/) then the best way to proceed is by creating a new python 3.8 enviroment – in my case I called this “esp-at”:
conda create -n esp-at python=3.8 anaconda
conda activate esp-at
Directly with Python #
If you already have python >3.8 then the interpreter is probably called “python3”. The scripts in the ESP-IDF call “python” though and for this reason we must create an alias. Ubuntu solves all these issues with the package “python-is-python3”:
alias python=python3
sudo apt-get install python-is-python3
At this point we need a couple more python package and then we are ready to clone the github repo:
python -m pip install pyyaml xlrdCloning and compiling ESP-AT #
We can now clone the git repo esp-at and call the script ./build.py:
cd ~
git clone --recursive https://github.com/espressif/esp-at.git
cd esp-at
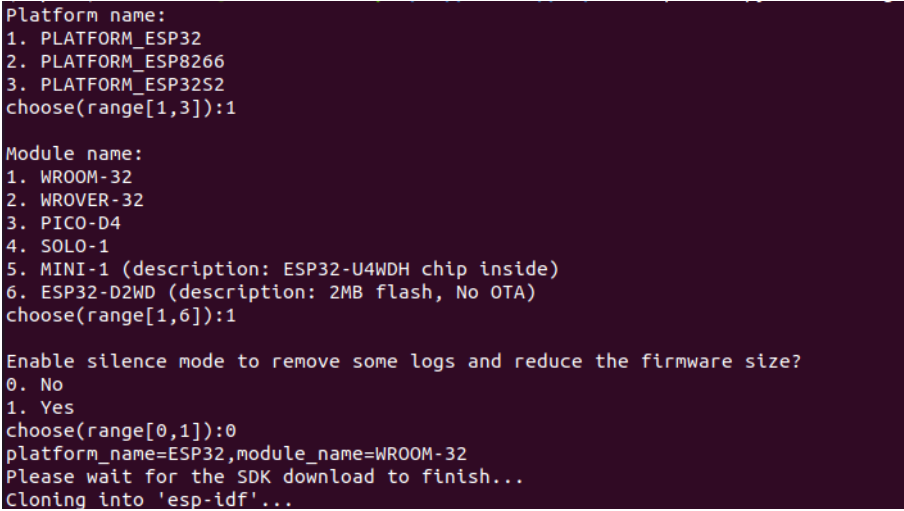
./build.py menuconfigAt this point we haven’t downloaded the ESP-IDF yet and the build.py menuconfig will ask us which module do we want to compile the firmware for and it will download the correct ESP-IDF. Since we are using a ESP32-WROOM-32 based devkit, we select 1 twice – once to select the ESP32 platform and again to select WROOM-32 and then select 0 to disable silence mode:
The previous command will download the firmware, but not install it and as a result it will end in an error:
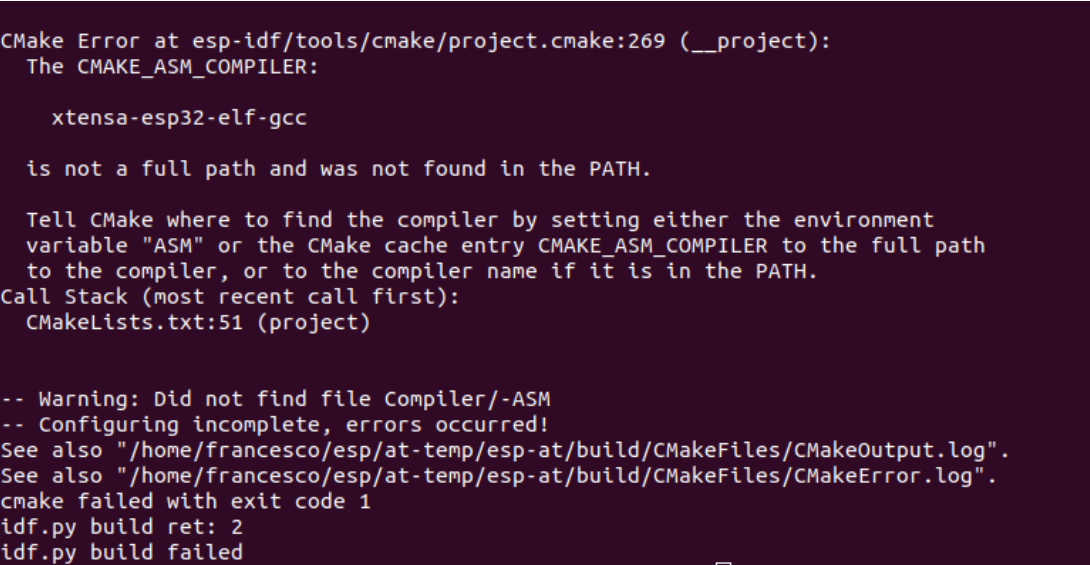
For this to work, we need to install the ESP-IDF using the “install.sh” script found in the esp-idf directory:
python -m pip install -r esp-idf/requirements.txt
./esp-at/esp-idf/install.sh
We then need to source the script “export.sh”, also found in the esp-idf directory, in order to export all the environment variables required to compile the source code:
. ./esp-at/esp-idf/export.shWe’re almost there. Before calling the menuconfig, we need to install ncurses, if not already installed:
sudo apt-get install libncurses5-dev
./build.py menuconfig
We can now see the menuconfig tool with the options for all the modules. We won’t be changing the default configuration in this tutorial, but in the next tutorial we’ll be looking more closely at what changes we can make:

We are now ready to flash the firmware:
./build.py flashIf everything goes well, you end up with a screen like the one below.

USB permissions #
You may encounter a Serial exception caused by permission denied:

If so, you’ll need to add the current user to the group dialout and restart the system:
sudo adduser $USER dialout
sudo reboot
Conclusion #
In this tutorial we download the AT firmware esp-at, had a look at the menuconfig tool and compiled and flashed it.
Next #
- To change the default AT command port to UART 0 (if you don’t have a USB/UART): Customise firmware
- To start with a simple BT SPP example: Bluetooth SPP esp-at


