
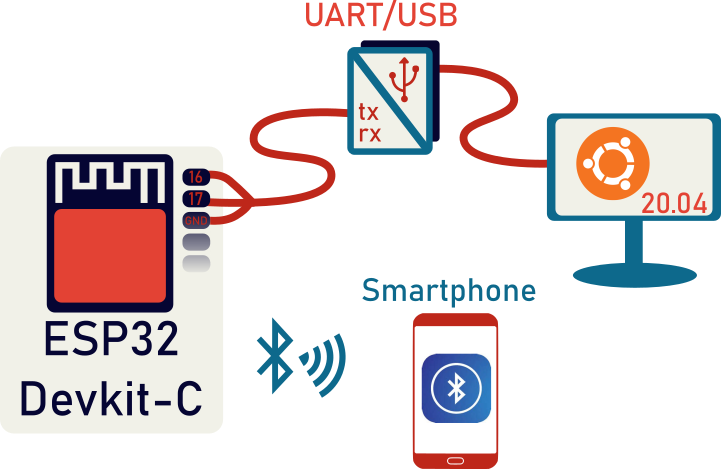
In this tutorial we will be setting up a trasparent serial connection between an ESP32 module and a Smartphone, just like we did in the previous tutorial, however this time instead of using Bluetooth classic, we will be using Bluetooth LE.
Introduction #
Previously, we used AT commands to connect to a Smartphone using the Bluetooth classic SPP protocol, however Bluetooth Low Energy (BLE) does not support the SPP profile because BLE is GATT profile based. Simply put it means that a BLE device shows services which contain characteristics, and characteristics can then be read to or written from. The GATT profile is well suited for sensors and for configuration parameters because each value is neatly presented in its own characteristics, but to achieve a serial communication some tweaking is required because the serial protocol must be emulated through the use of two characteristics: one for reading and one for writing.
The Espressif AT firmware contains the AT+BLESPP command, which takes care of the emulation of the serial protocol via BLE characteristcs and this is the command which we will use in the tutorial.
Hardware setup #
For this tutorial you’ll need:
- Espressif ESP32-DEVKIT-C – Contact us for more info
- PC running Linux
- The examples shown here are running on Ubuntu 20.04
- USB/UART Bridge connected between the ESP32-WROOM-32E’s UART1 and the Linux workstation.
- Smartphone with BLE Scanner (or similar app) installed:
The installed AT Firmware release can be checked with the command:
AT+GMR
which in our case gives:
AT version:1.1.3.0(5a40576 - Nov 28 2018 12:50:55)
SDK version:v3.0.7
compile time:Dec 21 2018 09:04:56
Bin version:1.1.3(WROOM-32)
If you don’t know how to send the command, please check our previous tutorials on this topic. The USB/UART bridge is connected according to the table below
| UART/USB | ESP32-WROOM-32E |
| TX | GPIO16 |
| RX | GPIO17 |
| GND | GND |
Procedure #
The first two commands we need to send are for starting the BLE server (AT+BLEINIT=2) and giving an (optional) name to the bluetooth device.
AT+BLEINIT=2
AT+BLENAME="esp_test"
If we had given the command
AT+BLEINIT=1
instead, we would have started the module as a BLE client.
Next we have to start the GATT service, which contains the characteristics used by the BLE SPP. Generally we would upload custom services, but for the BLE SPP any service with at least a write and a notification read characteristic is enough. For this reason we can simply use the example service, which is shipped with the default at firmware:
AT+BLEGATTSSRVCRE
AT+BLEGATTSSRVSTART
Our module cannot be found until we start the advertising, so the next step is to set up the advertising data and start the beacon transmission:
AT+BLEADVDATA="0201060809496E656C74656B030302A0"
AT+BLEADVSTART
The beacon data is comprised of a series of advertising data (AD), which consists in three fields, the data types can be found on the bluetooth SIG website. To show how this works, we can take a closer look at the first AD, which can be split into:
- 0x02 (length: the next two bytes are part of this AD)
- 0x01 (type: flag, check the link above)
- 0x06 = b00000110, where the bits mean “LE General Discoverable Mode” and “BR/EDR Not Supported.” You can do the same for the following two ADs.
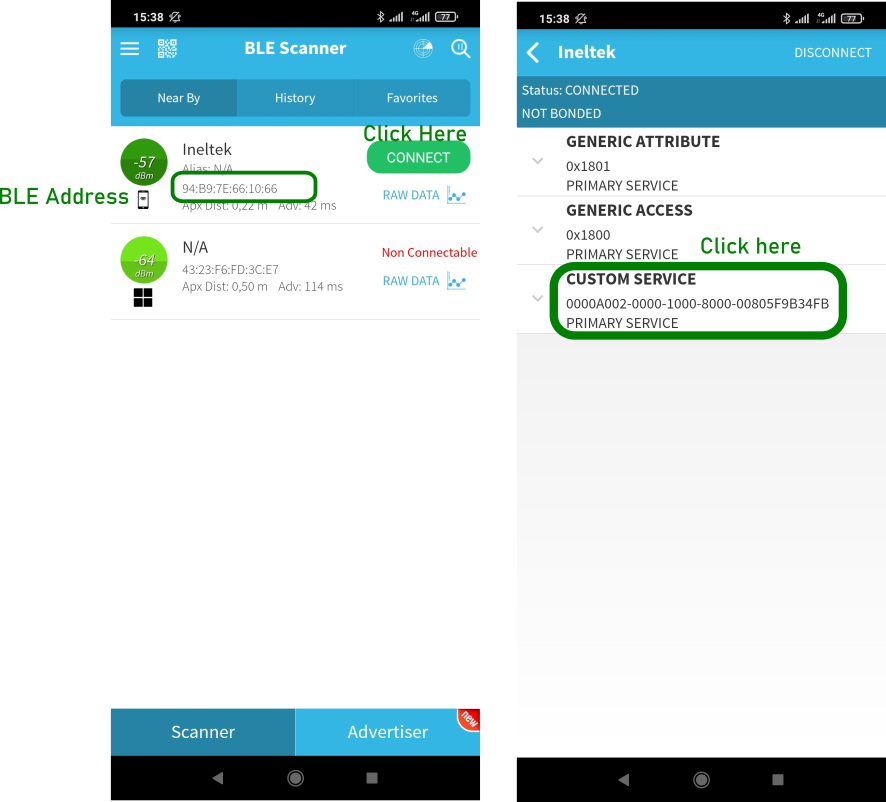
At this point you can open the BLE Scanner and find the device, as pictured below, if you’re not sure which is your device, you can check the BLE address with the command:
AT+BLEADDR?
Now click on the green Connect button and we’ll be shown all the services on the device, the first two are mandatory services included by default, while the third one is the example service shipped with AT firmware – which could be change if required.
After clicking "CONNECT" the device responds with:
+BLECONN:0,"xx:xx:xx:xx:xx:xx"
+BLECONNPARAM:0,0,0,6,0,500
+BLECONNPARAM:0,0,0,36,0,500
where the "xx"s correspond to the MAC address of your smartphone.
We must now select which characteristics will be used for the BLE SPP:
AT+BLESPPCFG=1,1,7,1,5
The parameters in this last command say that we want to change the parameters (the first one) and that we want to use
- Transmission characteristic: Service n.1 – Characteristic n. 7
- Receiving characteristic: Service n.1 – Characteristic n. 5
We have almost finished, to start the communication we need to activate the notifications in the 7th characteristic, by clicking on the "I" icon, as shown in the pictures below. The module replies with:
+WRITE:0,1,7,1,2,
Now we can send the last AT command:
AT+BLESPP
If the module emits ">" it means it’s ready to send and receive characters from the BLE Scanner app. If you write a character on the terminal, you will see it on the "value" field of the 7th (i.e. the receiving) characteristic, as shown below:
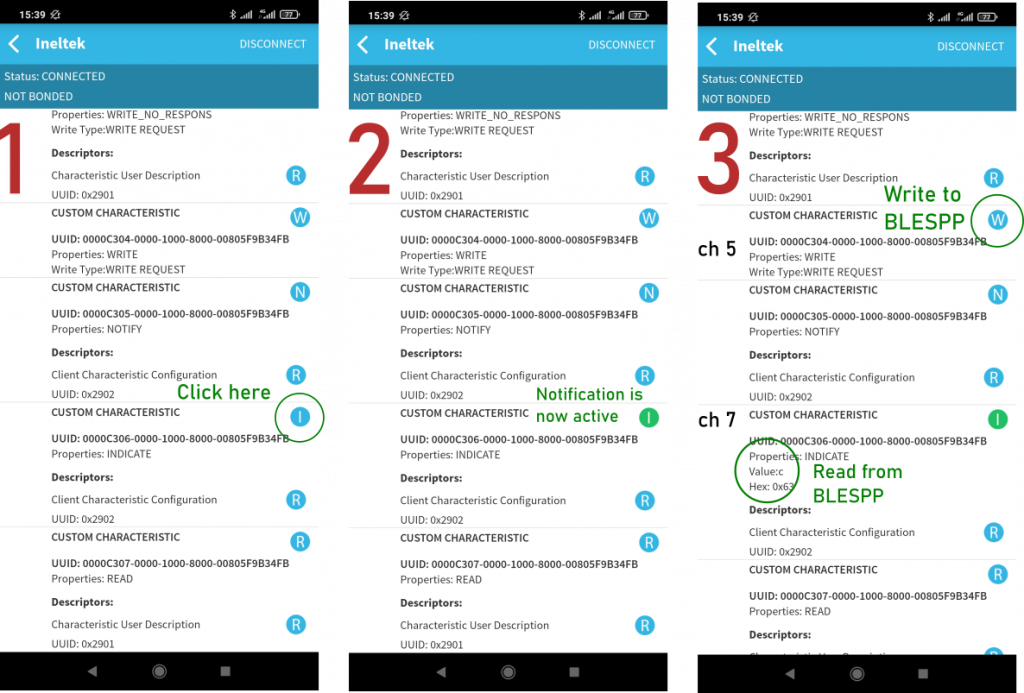
If you hit "W" on the 5th (i.e. transmitting) characteristic, you can enter a text which will be shown on the terminal, as illustrated below:

Conclusion #
In this tutorial we looked at how to enable a transparent UART connection between an ESP32 device via BLE. Since BLE does not include a SPP protocol, the serial connection is emulated using two service characteristics.


